Laser mirror adjustment tutorial
Laser mirror adjustment tutorial
Laser device mirror:
One of the most important points in adjusting the laser mirror is the alignment of the beam with the movement of the mechanical axis of the device. If the beam is not parallel to the axis movement, the deviation of the beam increases and the error coefficient increases, so the main goal of adjusting the mirror is Alignment of the laser beam with the mechanical and movement system of the device.
To adjust the mirror of normal laser cutting and engraving machines, several items and parameters should be considered in general. It should be noted that this work is done in three-dimensional space with three parameters X, Y, Z, and its complete analysis is not an easy task for any person and requires experience, but by applying some movement restrictions in the laser device, which is designed by an expert designer, The laser device is done.
The application of some movement dimensions by screws and holders is removed for the operator and once set by the installation expert and (if you ignore the depreciation and unconventional manipulation) it remains fixed forever without the need to change. which the operator can use to adjust the laser mirror, the adjustment screws and the reflection direction of each laser mirror relative to the other and finally the lens, usually each mirror has three adjustment screws, one at the top of the laser mirror and two at the bottom are located.
Precise adjustment of the laser mirror
Laser mirror height adjustment screw (upper screw):
If the top screw is turned to the left or right, the laser mirror head moves forward or backward, and the reflection of the mirror moves the laser beam up and down.
Adjust the mirror of the laser device
Screws for adjusting the reflection of the laser mirror to the left and right:
The lower screws of the laser mirror work symmetrically, that is, if the right screw is turned in the closing direction, the mirror moves forward to the right and the reflection beam moves to the left, and if the screw is turned in the opening direction, the mirror moves back to the left. It moves symmetrically. If the left screw is turned to the closing direction, the laser mirror moves to the left and the reflection beam moves to the right, and if the screw is turned to the opening direction, the mirror moves back to the right.
1- Turn the top screw in the closing direction, The laser mirror head is lowered, The laser beam goes down
2- Turn the top screw in the opening direction, The head of the laser mirror rises, The laser beam rises
3- Turn the right screw in the closing direction, The laser mirror angles to the left, The laser beam goes to the left
4- Turn the right screw in the opening direction, The laser mirror is angled to the right, The laser beam goes to the right
5- Turn the left screw in the closing direction, The laser mirror is angled to the right, The laser beam goes to the right
6- Turn the left screw in the opening direction, The laser mirror angles to the left, The laser beam goes to the left
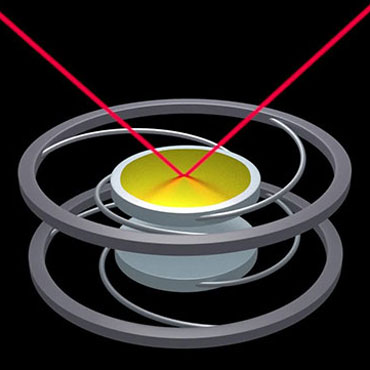
The laser mirror needs to be adjusted for installation, which was explained to you in the previous section about the adjustment screw of the laser device mirror. As it is known, there are two laser mirrors on the laser device to transmit the beam to the head on the machine. The first laser mirror, which is known as the fixed mirror or the Y-axis mirror, is placed in front of the laser tube and is responsible for transferring the laser to the second laser mirror, which is called the moving mirror or the X-axis mirror. The proper distance between this mirror and the laser tube It is 5 cm.
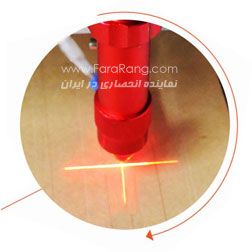
In this case, by pressing the Fire-Pulse button, a beam with a certain length of time hits the first laser mirror and its reflection appears on the second laser mirror. This mark can be in the form of a burn on paper glue or a white spot on transparent and clear acrylic. In this case, the two laser mirrors have the smallest distance from each other, so the place where the beam hits the X mirror is determined as a reference and used in the next step.
For a better and more accurate adjustment, we recommend creating only one pulse with a very short time that does not leave a lot of burn or black effect. This helps the displacement of the spot where the beam hits at farther distances to be easily recognized and observed by the eye.

 Full specifications and price list